This frame allows you to describe in detail this component of the item to be printed. You can also
specify constraints on the production method here. If you have arrived at this point through the
selection of a Quick quote, you will find the details already populated, and may only have to
change the quantity.
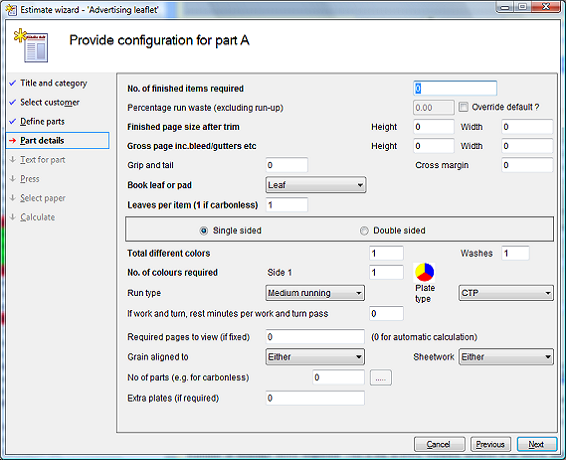
Number of finished items required: This is the quantity required, whether it be books, pads or
leaves.
Percentage run waste (excluding run up): In the options tab of system configuration it is
possible to set up parameters for calculating run waste - i.e. the the wastage during the run and
allowance for folding, laminating, etc. (Note that this figure does not include any run-up sheets
for the press, which are allowed for elsewhere.) You can choose to override this figure by clicking
the override box and entering your own percentage figure here. If all the figures in the system
configuration run waste table are zero, then the table will not be used: the entered run waste
figure if any will be used instead.
Finished page size after trim:- Enter the finished size of the job - letter, business card,
book
page size, etc. You don't have to type in the figures if the size is in the dimensions file Just key in
the size name (or as much as will fit). E.g. you can simply type in 'A4' for the height and the size
for an A4 page will be entered for you automatically. The gross page size will also be initialized
to the same dimensions.
This specifies the net size of the finished page (or item if it comprises only 1 page). Printpak will
work out the best arrangement of the job on the plate(s) irrespective of whether the page is
described as being 'portrait' (height greater than width) or 'landscape' (width greater than
height).
The only consideration you MUST make is in the case of a book, when you specify whether the
book is hinged at the top or side. Then Printpak will arrange the pages specifically in the manner
you have suggested. So if you are producing a 'Portrait ' 4 page leaflet, and you have described
the height as larger than the width, you should specify it as hinged at the side.
Should you want the same leaflet to be landscape, then the hinge should be specified as at the
top
Gross page inc.bleed/gutter etc.: Enter the gross size of the job, allowing for bleed,
cut marks
and gutters etc. This is the letter, business card, or book page size - the gross size to cater for
any print needed outside the finished page size.
N.B. This is NOT the size of material you are going to print on . If it is a book you are printing, the
'Gross page inc.bleed/gutter etc.' will be normally be just a little larger than the finished page size
- it will NOT be the opened out size of the book
Again, you can key in the size name (or as much as will fit). E.g. you can simply type in 'A4' for
the height and the size for an A4 page will be entered for you automatically.
Printpak will, if the cutting calculation is operative, automatically calculate the post-press cutting
for you (except in the case of 'book ' jobs) taking the bleed and /or gutters into account.
Grip and tail: If grip and/or tail are likely to be relevant to the printing of this item, how much
extra should be allowed? You need to think about the grip your machine needs to print the job -
and any space required for colour indicator bars or similar at the bottom of the sheet (tail). If you
are printing a letterhead on cut-size paper - there is NO need for grip and tail unless, for example,
you have to print a bleed on the top or bottom of the sheet.
Cross margin: Here you should Enter the extra margin you wish to leave on the plate edge at
right angles to the grip.
Book leaf or pad: This concept is central to the way Printpak considers the job. You should
read the following definitions carefully, as to make a mistake in classifying your job in this respect
will have far-reaching effects on your calculation.
· Book- This is any job in book form (i.e. folded pages) that has leaves 'hinged' at the
side or top. Thus a 'book' is considered to have the number of its pages divisible by
4, e.g. 4, 8,12, 32, 128, etc. If you are describing a '6 page' document, a folder (with
flaps or pockets) or a '10 page concertina' document then describe it as a leaf and
enter the overall (opened out) size in page size. Carbonless 'books', unless they are
true 'books' with folded pages should be considered as pads
· Leaf- Any job in a 'flat' form - Letterhead, Compliment Slip, Business Card, etc. is a
leaf. In this case the 'Leaves per item' is the number of different leaves making up the
job- e.g. 4 different business cards, 27 leaves of a manual (to be punched for a
binder - not in 'book' form), 2 different folders, etc. N.B. In the case of carbonless
(NCR) sets, enter '1' in 'Leaves per item' - you will put the additional leaf /leaves
description in when you enter the 'Number of parts'.
· Pad - If the job requires a series of carbonless (NCR) sets or a multi-set of similar
size leaves to be padded or bound together (up to 9 parts) then treat the job as Pad.
Leaves per item(1 if carbonless) or Pages per book (divisible by 4): This is the number of
pages in the finished job. If you specify the job as 'leaf ' or 'pad ' then this is the number of
finished SHEETS required in each finished item.
If you specify 'book ' then this is the number of SIDES in the finished book.
If, say, you are printing 2 business cards the same size but with different content, you would
specify this as 2 leaves. As books consist of pairs of pages hinged together, it follows that a book
can only have a multiple of 4 pages. The calculation will make its own adjustments to the number
of pages for books if necessary. Carbonless (NCR) jobs, if they are calculated as a single
component, are limited to a single set, so for these you should enter 1.
Single or double sided: This is the number of sides the job is printed. In book form, such as a
cover, '1' would indicate the outer (or inner) side only of the item.
Total different colors: If a letterhead is printed Black and Blue on side 1 and Black and Red
on
the reverse (side 2), then the 'Total different colours' would be '3' - the Black ink being common.
Printpak will calculate the wash-up charges for the press automatically, using this figure.
Washes:- When you have put in the 'Total different colors', Printpak will enter the same figure in
'Washes' for you, , but you can change the number of wash-ups you wish to charge - e.g. double
wash-ups for Silver or no wash-up for Black.
Numbers of colors required: This is fairly obvious, except when you enter 1 (single) color. If you
have 1 in either of the boxes, you will notice a large black or coloured spot beside it. This
indicator shows whether that single colour is black or a "spot" colour. You can toggle between
the two by clicking the spot. This is particularly designed for digital press calculation, where a spot
colour is charged at a full colour click rate.
Run type: This refers to the run rates set up under 'Parameters' for each press. Choose
between light, easy running, medium (default) standard running; and heavy, difficult running.
Plate type: Four types of plate may be specified as standard plates, and used in calculation.
Their descriptions are set in System Configuration, where you can also specify the default. This
drop-down allows you to select which type to use for this job.
If work and turn, rest minutes per work and turn pass: Each work and turn or work and
tumble pass will have an associated rest time, when the ink is drying after the first 'half pass'.
During this time the press is usually inactive. Printpak will cost the time taken and it will influence
the calculation of the best strategy. So for this job, how long do you estimate has to be allowed
for this? If it is a single sided job, or if it is to be run as 'Sheetwork only' you can safely ignore this
field.
Required pages to view (if fixed): Printpak is an 'expert' system and can work out the best
option for printing which includes the ideal pages to view for the chosen press and the sizes
available in the chosen material (even allowing for pre-press trimming). However, if you wish to
restrict or specify the number to view of the item(s)on the plate (or artwork), then do so. Printpak will then calculate the job method to your
specification. It is usually better to leave it set to zero, in which case Printpak will work out the
best solution automatically.
Grain Aligned to:- You can, should you wish, ask Printpak to arrange the printed job so that the
grain direction of the material runs down the height of the job or across the width. This feature is
normally only necessary if the job is a cover (or similar item) and folding will crack or cause
'breakout' to the material or printed finish along the 'spine'. The way the grain direction is related
to the job is always displayed in the paper window of the calculations tab of the job desktop (if
calculated). Overriding the grain alignment will alter the way (in many cases) that the job fits both
the press and material - and will often result in a different cost of production. N.B. It is not
advisable to adjust grain alignment unless it is a specific demand of the job.
Sheetwork:- There are three options here. 'Sheetwork only' means that work and turn (or
tumble) is not used. 'Work and turn' (which includes tumble) means that regardless of cost, work
and turn or tumble will be used (for jobs containing more than a plateful, the w/t may be for just
the left-overs) and and 'Either' means means that work and turn or tumble will be suggested if it
offers a cost benefit.
No: of parts (e.g for carbonless): Enter the number of parts (leaves) that make up a carbonless
(NCR) set or similar. If you enter a figure other than the default '1' you should also press on the
"..." button next to it. This will reveal the Carbonless definition screen. This is an easy-to-use
table to lay out the number of 'Ink Colors' and additional 'Plate Changes' required for the
complete multi-part job. Printpak needs no further information to calculate the number of passes,
material and make-readies required to do the job.
Extra plates (if required). You can specify here if you have plate changes within the running of a
job - e.g. to change an overprinted branch address. The calculation will automatically charge for
the extra plates and allow for the associated make-readies. Note that if you are defining a multi-part set this feature will be disabled, since you can specify extra plates as 'plate changes' in the
Carbonless definition screen.
Press Next to enter the description of this part